What is Jekyll and How Does It Work with GitHub Pages?
Jekyll is a static site generator that takes plain text files written in Markdown or Textile, runs them through Liquid templates, and produces a complete, ready-to-publish static website. Unlike content management systems like WordPress, Jekyll doesn't use a database. Instead, it generates all the HTML, CSS, and JavaScript files beforehand, making your site incredibly fast and secure. This pre-rendering process is one of its core strengths, significantly reducing server-side processing and improving load times for visitors. For developers, this means a streamlined workflow, as they can focus on content creation and styling without worrying about database management or complex server configurations. The simplicity and efficiency of Jekyll make it a popular choice for blogs, portfolios, and documentation sites where performance and maintainability are key.
GitHub Pages, on the other hand, is a free hosting service provided by GitHub that allows you to publish websites directly from your GitHub repositories. It's designed to host static sites, which makes it a perfect companion for Jekyll. When you push your Jekyll project to a GitHub repository, GitHub Pages automatically detects the Jekyll configuration, builds your site, and deploys it to a unique URL. This integration simplifies the deployment process immensely; you don't need to manually upload files via FTP or configure a web server. Any changes you commit to your repository are automatically reflected on your live site within minutes, creating a powerful and efficient continuous deployment pipeline. This synergy between Jekyll's static site generation and GitHub Pages' effortless hosting makes it an ideal solution for developers and content creators looking for a robust, free, and easy-to-manage web presence.
The combination of Jekyll and GitHub Pages is particularly appealing for open-source projects, personal blogs, and documentation sites. It provides a version-controlled environment for your website's content, allowing for easy collaboration and rollback to previous versions if needed. Furthermore, since GitHub Pages serves static files, your site benefits from inherent security advantages, as there's no server-side scripting or database to exploit. This setup is not only cost-effective but also incredibly scalable, capable of handling a significant amount of traffic without performance degradation. Understanding how these two technologies work together is fundamental to building and deploying your static website effectively.
Why is Folder Structure Important for Jekyll Projects?
A well-defined folder structure is paramount for any Jekyll project, especially when deploying to GitHub Pages. It's not just about tidiness; it directly impacts how Jekyll processes your files, organizes your content, and ultimately, how your website functions. Without a logical and consistent structure, your project can quickly become a tangled mess, making it difficult to locate specific files, manage content, and debug issues. A proper structure acts as a blueprint, guiding Jekyll's build process and ensuring that all components of your site are correctly rendered and linked. This organization is crucial for both small personal blogs and larger, more complex documentation sites. Imagine trying to find a specific blog post or an image without a clear directory hierarchy; it would be a frustrating and time-consuming endeavor.
Beyond personal convenience, a standardized folder structure is essential for collaboration. When multiple contributors are working on the same Jekyll project, a consistent layout ensures that everyone understands where different types of files belong. This reduces the chances of misplacing files, overwriting content, or introducing errors due to disorganization. New team members can quickly grasp the project's architecture, enabling them to contribute effectively from the outset. Furthermore, a logical structure makes it easier to implement best practices for static site development, such as separating content from presentation, managing assets efficiently, and optimizing for performance. It's the foundation upon which a scalable and maintainable website is built, allowing for future expansion and easier updates without overhauling the entire project.
For GitHub Pages specifically, adhering to a conventional Jekyll folder structure simplifies the deployment process. GitHub Pages expects a certain arrangement of files to correctly identify and build your Jekyll site. Deviations from this expected structure can lead to build failures, incorrect rendering of your site, or even prevent your site from deploying altogether. It's similar to following a recipe; if you don't add ingredients in the right order or in the right quantities, the final dish won't turn out as expected. A well-organized Jekyll project also makes debugging significantly easier. When something goes wrong, you can quickly narrow down the potential source of the problem by knowing exactly where different types of files are located. This efficiency saves valuable development time and reduces frustration, allowing you to focus on content creation and site enhancements rather than battling with structural issues.
Ultimately, investing time in understanding and implementing a sound folder structure for your Jekyll project pays dividends in the long run. It leads to a more robust, maintainable, and scalable website, a smoother development workflow, and a more efficient deployment process with GitHub Pages. It's a foundational aspect of Jekyll development that directly impacts the success and longevity of your static site.
What are the Core Directories in a Jekyll Project?
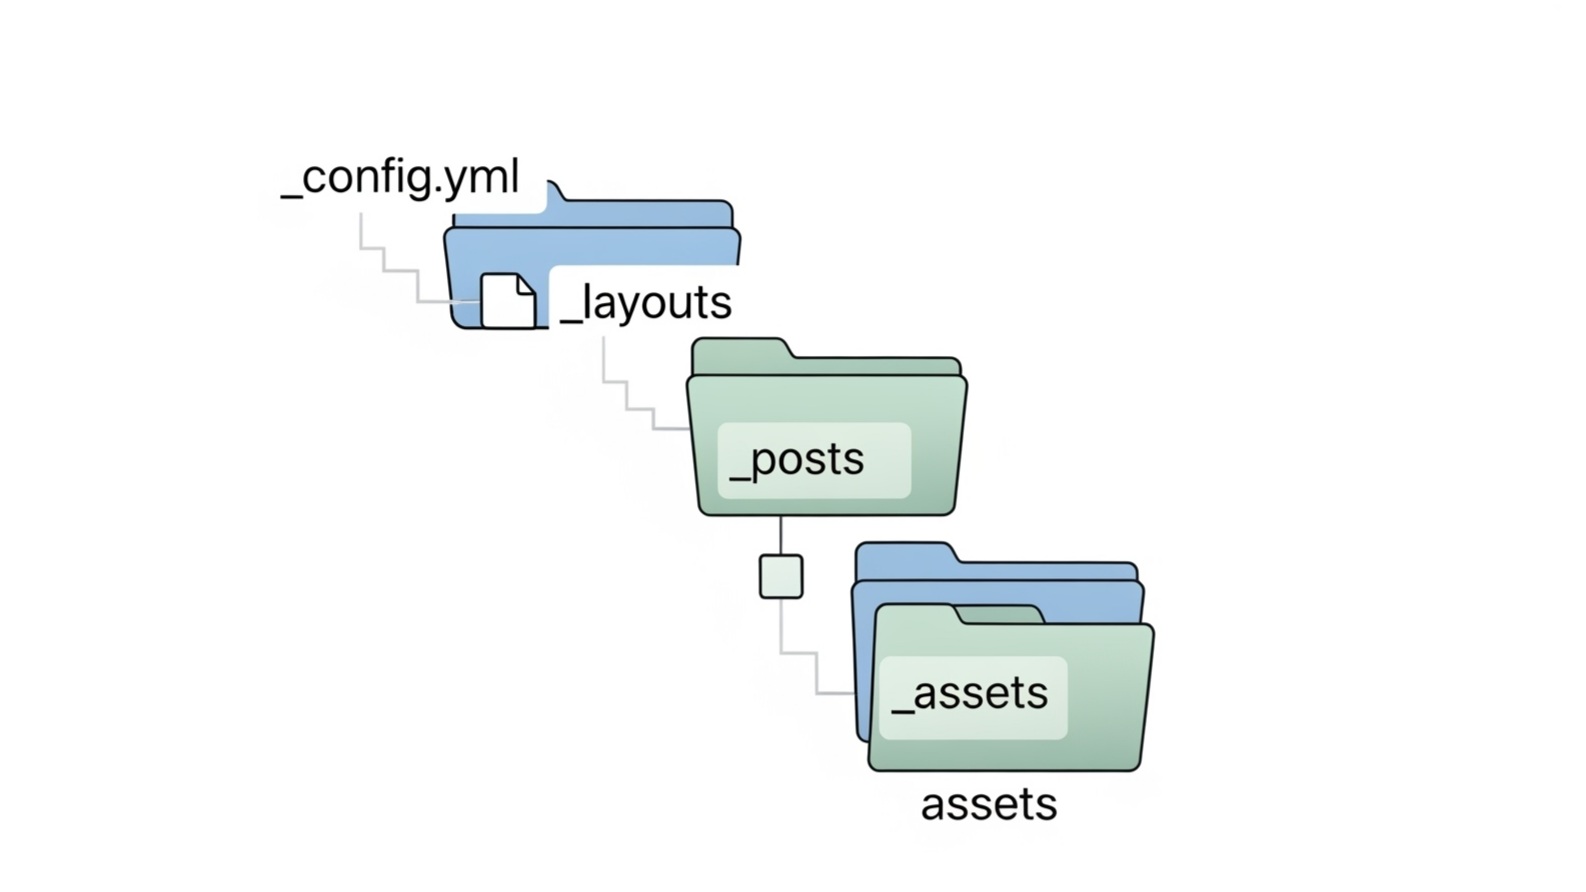
When you initialize a new Jekyll project or look at an existing one, you'll immediately notice a set of core directories and files that form the backbone of your site. Understanding the purpose of each of these is crucial for effective Jekyll development and seamless deployment on GitHub Pages. These directories are where Jekyll expects to find specific types of content and configuration, allowing it to build your static site correctly. Getting familiar with them is the first step toward mastering Jekyll.
The _posts Directory
The _posts directory is arguably the most fundamental directory in any Jekyll blog or content-heavy site. This is where all your blog posts reside. Each post is typically a Markdown file (e.g., 2023-07-28-my-first-post.md) and follows a strict naming convention: YEAR-MONTH-DAY-title.EXTENSION. This convention is vital because Jekyll uses it to sort your posts chronologically and generate their URLs. For instance, a file named 2025-07-28-understanding-jekyll-structure.md would be processed as a blog post published on July 28, 2025, with a slug of understanding-jekyll-structure. Inside each post file, you'll find YAML Front Matter at the top, which contains metadata like the post's title, author, categories, tags, and date. This metadata is crucial for Jekyll to render the post correctly and for themes to display additional information. Without the correct naming convention and front matter, Jekyll may not recognize your files as posts, leading to them being omitted from your site. The _posts directory is continuously monitored by Jekyll's build process, so any new files or modifications will trigger a rebuild of your site, making it a dynamic hub for your content.
The _layouts Directory
The _layouts directory holds the structural templates for your website. Think of layouts as the blueprints that define the overall look and feel of different types of pages on your site. For example, you might have a default.html layout that includes your site's header, navigation, and footer, providing a consistent wrapper for all your content. You could also have a post.html layout specifically designed for blog posts, which might include elements like author information, publication date, and comment sections. Similarly, an _page.html layout could be used for static pages like "About Us" or "Contact." When Jekyll processes a page or post, it combines its content with the specified layout. This separation of content from presentation is a powerful feature of Jekyll, promoting reusability and making it easy to change the site's design without modifying individual content files. If you decide to update your site's navigation bar, you only need to modify it in the default.html layout, and the change will be reflected across all pages that use that layout. This modularity greatly simplifies site maintenance and redesigns, allowing for efficient updates across your entire web presence. By carefully crafting your layouts, you can ensure a consistent user experience and a professional appearance for your Jekyll site.
The _includes Directory
The _includes directory is where you store reusable snippets of code or content that you want to insert into your layouts or other pages. This directory is incredibly useful for maintaining consistency and reducing redundancy across your site. Instead of repeating the same HTML or Markdown code in multiple places, you can create an include file and then reference it wherever needed. Common examples of includes include navigation menus, sidebars, social media links, author bios, or even small interactive elements. For instance, if you have a complex footer that appears on every page, you can create a footer.html file in the _includes directory and then simply use {% include footer.html %} in your layouts. This approach makes your code cleaner, more manageable, and easier to update. If you need to change your navigation links, you only modify the navigation include file, and the changes are instantly reflected wherever that include is used. This principle of "Don't Repeat Yourself" (DRY) is a cornerstone of efficient web development, and the _includes directory in Jekyll embodies it perfectly. It significantly streamlines development, reduces potential errors, and makes your project much more maintainable in the long run.
The _data Directory
The _data directory is used to store structured data that you want to use throughout your Jekyll site. This data is typically in YAML, JSON, or CSV format. It’s an excellent way to separate content that isn't directly a post or a page but is still essential for your site's functionality. For example, you might store a list of team members, a portfolio of projects, navigation links that are not hardcoded, or even complex configuration settings. By placing this data in the _data directory, you can access it programmatically within your layouts and includes using Liquid. This makes your site more dynamic and easier to update without needing to modify your HTML directly. For instance, if you have a list of frequently asked questions, you could store them in a faqs.yml file. When you need to update an answer, you just modify the YAML file, and Jekyll rebuilds the site with the updated information. This separation of data from presentation allows for more flexible and maintainable websites, especially for content that changes frequently but doesn't warrant its own page or post. It's a powerful feature for building complex static sites with organized and easily manageable content.
The _sass Directory
The _sass directory is where you organize your Sass (Syntactically Awesome Style Sheets) files. Sass is a CSS preprocessor that extends CSS with features like variables, nested rules, mixins, and functions, making CSS more powerful and easier to maintain. Jekyll has built-in support for Sass, allowing you to write your styles in a more organized and efficient manner. Inside the _sass directory, you'll typically find partial Sass files, prefixed with an underscore (e.g., _variables.scss, _mixins.scss), which are then imported into a main Sass file (e.g., main.scss) that resides in your root CSS directory (often /css). This modular approach helps you break down your stylesheets into smaller, more manageable components, improving readability and maintainability. For example, all your color variables could be in _variables.scss, and reusable sets of CSS declarations in _mixins.scss. When Jekyll builds your site, it compiles these Sass files into standard CSS, which your browser can then understand. Using Sass through the _sass directory is highly recommended for any Jekyll project that requires more than basic styling, as it significantly enhances the development workflow for CSS and ensures your stylesheets are well-organized and scalable.
What are the Essential Files in a Jekyll Project?
Beyond the core directories, several essential files play critical roles in configuring your Jekyll project and ensuring it functions correctly, especially when deployed to GitHub Pages. These files often contain site-wide settings, provide a starting point for styles, or define how Jekyll should process certain content. Understanding their purpose and how to configure them is key to a successful Jekyll site.
The _config.yml File
The _config.yml file is the heart of your Jekyll project's configuration. It's a YAML file where you define global settings for your site, influencing how Jekyll builds and processes your content. This file is crucial because it controls everything from your site's title and description to its URL structure, pagination settings, and even which files to include or exclude during the build process. For example, you can set the base URL for your GitHub Pages site, define default values for front matter, configure plugins, or specify the permalink style for your posts. Any changes made in _config.yml require Jekyll to be restarted (if running locally) or a new build on GitHub Pages to take effect. It's common practice to store site-wide variables here, such as author names, social media links, or API keys, allowing you to access them throughout your templates using Liquid. This centralization of configuration makes your site highly flexible and easy to manage, as you don't have to hardcode these values into multiple files. Understanding and properly configuring your _config.yml is paramount for tailoring your Jekyll site to your specific needs and ensuring it deploys seamlessly on GitHub Pages.
The index.html or index.md File
The index.html or index.md file at the root of your Jekyll project serves as your site's homepage. This is the first page visitors see when they navigate to your site's URL. If it's an index.md file, Jekyll will process it as Markdown and convert it to HTML. This file typically uses a layout defined in your _layouts directory (e.g., default.html) and can contain static content, an introduction to your site, or a list of recent blog posts. For most Jekyll sites, the index.html file acts as the primary entry point, providing a welcoming landing page for users. Its content is crucial for setting the tone of your site and guiding visitors to other relevant sections. For blogs, it often features a dynamic list of posts generated using Liquid loops, allowing new content to appear automatically as you publish it. Ensuring this file is well-designed and informative is essential for a positive user experience, as it's often the first impression your site makes on visitors. Its simplicity and directness are key to a fast-loading and engaging homepage.
The Gemfile and Gemfile.lock Files
The Gemfile and Gemfile.lock files are integral to managing your Jekyll project's dependencies, especially when working with GitHub Pages. The Gemfile lists all the Ruby gems (libraries) your Jekyll project relies on. This typically includes the jekyll gem itself and any additional plugins you might be using, such as jekyll-feed or jekyll-sitemap. When you run bundle install, the Bundler tool reads your Gemfile and installs all the specified gems. The Gemfile.lock file is then automatically generated. It records the exact versions of all gems and their dependencies that were installed. This "lock" file is critical for ensuring that everyone working on the project, including GitHub Pages' build environment, uses the exact same versions of the gems. This prevents "it works on my machine" scenarios, where differences in gem versions can lead to build errors or unexpected behavior. By committing both Gemfile and Gemfile.lock to your GitHub repository, you guarantee a consistent build environment, making your Jekyll site's deployment on GitHub Pages reliable and predictable. If you add new plugins or update Jekyll, you'll need to update your Gemfile and regenerate your Gemfile.lock file to reflect these changes. These two files are essential for dependency management and ensuring the stability of your Jekyll project across different environments.
How Can You Customize Your Jekyll Folder Structure?
While Jekyll provides a default, conventional folder structure that works well for most projects, it also offers a degree of flexibility to customize this structure to better suit your specific needs. This customization can be particularly useful for larger projects, or when you have unique content types that don't fit neatly into the standard _posts or regular pages. However, it's important to approach customization thoughtfully, as deviating too far from conventions can sometimes make your project less intuitive for others or harder to debug. The key is to balance flexibility with maintainability and clarity.
Using Collections for Custom Content Types
One of the most powerful ways to customize your Jekyll project's organization is by using collections. Collections allow you to define custom content types beyond just posts and pages. For example, if you're building a portfolio site, you might want a collection for "projects." If you're creating a documentation site, you might have collections for "guides" or "API references." To create a collection, you first define it in your _config.yml file:
collections:
  projects:
    output: true
    permalink: /portfolio/:path/
  guides:
    output: true
    permalink: /docs/:path/
In this example, projects and guides are the names of your collections. The output: true setting tells Jekyll to generate a separate HTML page for each item in the collection, similar to how posts and pages are handled. The permalink setting defines the URL structure for items within that collection. Once defined, you create a corresponding directory at the root of your project, prefixed with an underscore, just like _posts. So, for our examples, you would create _projects and _guides directories. Inside these directories, you can place your individual project or guide files (e.g., my-awesome-project.md, getting-started-guide.md). Each file in a collection should also have YAML Front Matter, just like posts. This allows you to add metadata specific to that content type. Using collections significantly enhances the organization of your site, making it easier to manage diverse content and create tailored layouts for each content type. It provides a structured way to extend Jekyll's capabilities beyond its default assumptions, making your site more robust and scalable.
Changing Source and Destination Directories
While not as common, you can also customize the source and destination directories for your Jekyll site through the _config.yml file. By default, Jekyll looks for source files in the root directory of your project and outputs the generated site into a _site directory. However, you can change these defaults:
source: my_source_folder
destination: my_output_folder
The source configuration specifies the directory where your Jekyll source files are located. If you prefer to keep your Jekyll project within a subdirectory of a larger repository, this can be useful. The destination configuration defines where Jekyll will output the static files after building your site. While GitHub Pages typically expects the built site in the root or a docs/ folder, changing the destination locally can be helpful for specific build pipelines or local development setups. However, it's important to note that if you change the destination, you might need to adjust your GitHub Pages settings to point to the new output directory, as GitHub Pages by default looks for the built site in the root or a docs/ folder. Generally, it's recommended to stick to the default _site destination for GitHub Pages deployments unless you have a compelling reason to change it. These options provide flexibility for advanced users or specific project requirements, but for most standard Jekyll sites, the default settings are sufficient and often easier to manage.
Excluding and Including Files and Directories
Jekyll provides options to control which files and directories are processed and which are ignored during the build process. This is done through the exclude and include settings in your _config.yml file. By default, Jekyll excludes certain files and directories, such as those starting with . (like .git) or ending with ~, and directories like vendor, node_modules, and _site. However, you might want to explicitly exclude other files or directories that are part of your development workflow but not needed in the final built site. For example, you might have a _drafts folder for unfinished posts that you don't want published yet. You can add it to your _config.yml:
exclude:
  - Gemfile
  - Gemfile.lock
  - node_modules/
  - _drafts/
Conversely, if you have files or directories that Jekyll normally ignores but you want to include in your built site, you can use the include option. For instance, if you have a .well-known directory for specific web standards (like for HTTPS certificates), you might need to explicitly include it:
include:
  - .well-known/
These settings give you fine-grained control over what content ends up in your deployed site, ensuring that only necessary files are processed and published. This helps keep your site clean, reduces build times, and can even have security implications by preventing sensitive development files from being publicly accessible. Effectively managing your exclude and include lists is an important part of optimizing your Jekyll project for both local development and GitHub Pages deployment.
What are Common Folder Structure Mistakes to Avoid?
While Jekyll offers flexibility, certain folder structure mistakes can lead to frustration, build errors, and a disorganized project. Avoiding these common pitfalls will save you time and ensure a smoother development and deployment experience, especially when working with GitHub Pages. A little foresight in organizing your project can prevent significant headaches down the line.
Incorrect Naming Conventions for Posts
One of the most frequent errors Jekyll users encounter is incorrect naming of their post files. As mentioned earlier, Jekyll requires a strict naming convention for files within the _posts directory: YEAR-MONTH-DAY-title.EXTENSION (e.g., 2025-07-28-my-awesome-post.md). Forgetting the date, using an incorrect date format, or omitting the title slug will prevent Jekyll from recognizing your file as a post. This means the content won't be processed, won't appear on your blog, and you won't get any explicit error message during the build process, making it difficult to debug. For instance, naming a file my-awesome-post.md instead of 2025-07-28-my-awesome-post.md will cause it to be treated as a static file rather than a blog post. Always double-check your post file names to ensure they adhere to this critical convention. Consistency in naming is paramount for Jekyll to correctly sort and publish your content.
Placing Assets in the Wrong Directories
A common mistake is haphazardly placing static assets like images, CSS files, and JavaScript files. While Jekyll will copy any non-prefixed directories to the output, it's best practice to organize them logically. For example, images should typically go into an /assets/images/ or simply /images/ directory, CSS files into /css/ (with Sass partials in _sass/), and JavaScript files into /js/. Placing these assets directly in the root directory can make your project cluttered and difficult to navigate. More importantly, incorrect paths within your HTML or CSS to these assets will lead to broken links and a visually incomplete site. Always use relative paths when linking to assets within your Jekyll project to ensure they work correctly both locally and after deployment on GitHub Pages. A well-organized asset structure simplifies development and ensures your site loads all its components correctly.
Forgetting to Include or Exclude Necessary Files
Sometimes, developers forget to explicitly include or exclude files and directories in their _config.yml. This can lead to two main problems. First, sensitive development files (like configuration files with API keys or large, unoptimized images) might accidentally be included in your published site, leading to security vulnerabilities or unnecessarily large file sizes. Always review your project for any files that should not be publicly accessible and add them to your exclude list. Second, essential files might be unintentionally ignored by Jekyll. For example, if you have a custom JavaScript file that's not in a commonly recognized Jekyll directory, you might need to add it to your include list to ensure it's copied to your built site. A thorough review of your _config.yml's include and exclude settings is crucial before deploying your Jekyll site to GitHub Pages to prevent these common issues.
By being mindful of these common mistakes and adhering to best practices for folder structure, you can create a more organized, efficient, and trouble-free Jekyll project that deploys smoothly on GitHub Pages. A well-structured project is the foundation for a successful static website.
How Does GitHub Pages Interpret Jekyll's Folder Structure?
When you push your Jekyll project to a GitHub repository, GitHub Pages acts as a specialized Jekyll build environment. It doesn't just host your files; it actively interprets your project's folder structure, builds your Jekyll site, and then serves the resulting static HTML, CSS, and JavaScript. Understanding this interaction is key to successful deployment and troubleshooting any issues that might arise. GitHub Pages has certain expectations about where to find your Jekyll source files and how to build them.
Automatic Build Process
The most significant aspect of GitHub Pages' interaction with Jekyll is its automatic build process. When you commit changes to the designated branch (usually main or gh-pages) of your repository, GitHub Pages automatically detects the presence of a Jekyll project. It then installs the necessary Jekyll gems, including those specified in your Gemfile, and runs the Jekyll build command. The result is a set of static files (HTML, CSS, JS, images) that are then served. This automation means you don't need a local build step or to upload files manually; simply pushing your source code to GitHub is enough. This continuous deployment pipeline significantly streamlines the publishing process. If your Jekyll project has a standard structure and a correctly configured _config.yml, the build process is usually seamless. Any errors during the build will typically be reported in your GitHub repository's "Actions" tab or directly in the Pages settings, allowing you to debug and resolve them quickly.
Branch Considerations for Deployment
GitHub Pages allows you to choose which branch of your repository will be used to deploy your site. The most common options are:
mainbranch: This is often the default. If your Jekyll source files are in the root of yourmainbranch, GitHub Pages will automatically build and deploy from there.mainbranch/docsfolder: For projects where the main repository contains source code for a software project and you want to host documentation using Jekyll, you can configure GitHub Pages to build from adocs/subdirectory within yourmainbranch. This keeps your website source neatly separated from your application's source code.gh-pagesbranch: Historically, thegh-pagesbranch was a popular choice for hosting project websites. When you push your Jekyll project to this branch, GitHub Pages will automatically build and deploy it. This is particularly useful if you want to keep your website source separate from your main project's code or if your main branch is not intended for direct deployment.
The choice of branch depends on your project's structure and workflow. Regardless of which branch you choose, ensure that your Jekyll source files are correctly placed within that branch and that your GitHub Pages settings are configured to build from the correct location. This setting can be found in your repository's "Settings" tab under "Pages." Correctly configuring this ensures that GitHub Pages knows where to find your Jekyll project and initiate the build process.
URL Structure and BaseURL
Understanding how GitHub Pages generates URLs for your Jekyll site is crucial. For user or organization sites (e.g., username.github.io or organization.github.io), your site is served from the root domain. However, for project sites (e.g., username.github.io/repository-name/), your site is served from a subdirectory corresponding to your repository name. In this latter case, you must configure the baseurl setting in your Jekyll _config.yml file:
baseurl: "/repository-name" # The subpath of your site, e.g. /blog
url: "https://username.github.io" # The base hostname & protocol for your site
Failing to set the baseurl correctly for a project site will result in broken links to your CSS, JavaScript, images, and internal pages, as Jekyll will generate absolute paths that don't account for the repository subdirectory. The url parameter, while optional for Jekyll's build process, is good practice for SEO and for certain plugins that require a full URL. Properly setting these two variables ensures that all your links and assets resolve correctly, making your Jekyll site fully functional and navigable once deployed on GitHub Pages. This small configuration detail is often overlooked but is critical for the proper functioning of project sites.
By understanding these aspects of how GitHub Pages interprets and builds your Jekyll project, you can effectively deploy and manage your static websites, leveraging the seamless integration between these powerful tools.